Taking Next.js to Enterprise Scale: A Scaling Guide from CDN to API Gateway
Originally published in Turkish. Read the original →
Next.js works great with its default settings, until traffic and complexity grow. A comprehensive enterprise scaling guide covering CDN and cache strategies, horizontal scaling, API Gateway, Blob Storage and Event-Driven Architecture.
Next.js works perfectly well out of the box, until traffic and complexity cross a certain threshold. In this post I explain how to move to enterprise scale at that point without rewriting anything from scratch: from cache and CDN to horizontal scaling, from API Gateways to Event-Driven Architecture.
Next.js is a powerful full-stack framework built on React. It offers Server-Side Rendering (SSR) and Static Site Generation (SSG). It lets you build UI on the server while giving you direct access to server-side resources such as databases and file systems. It also simplifies frontend-backend communication through Server Actions.
The framework has a sophisticated built-in caching mechanism that requires minimal configuration and is very effective for small to medium-sized applications. In large-scale enterprise applications, however, going to production requires deeper architectural knowledge. To achieve efficiency and robustness at scale, developers need to go beyond the default settings and learn the art of combining advanced optimization techniques.
Defining the Problem
At the enterprise level, when scalability is the primary measure of success, applying strategic system design patterns is critical to maintain performance and use resources efficiently. Relying on default framework configurations may be enough to get started, but as traffic grows these defaults can turn into bottlenecks, leading to system instability and rising operational costs.
Setting Up SLA, SLO and Monitoring
Defining Quality of Service: SLA and SLO
Before shipping any application, we need to define the non-functional requirements that determine the system's success. These are categorized as SLA and SLO.
SLA (Service Level Agreement): A formal agreement with end users that defines the quality of service. Failing to meet these targets usually results in financial or legal penalties.
SLO (Service Level Objective): An internal target we aim to reach. It is usually stricter than the SLA to provide a “safety buffer” before penalties kick in.
Why Clear Targets Matter
Setting these metrics matters because they define a system's “usability.” These targets are usually driven by:
- Industry Standards: For example, Core Web Vitals. A page load time above 2 seconds can hurt SEO rankings, leading to lower traffic and revenue.
- Competitive Benchmarks: Matching or exceeding the performance of market competitors.
- Safety and Criticality: In high-risk systems (such as autonomous vehicles), real-time accuracy is a fundamental requirement; without it the system is fundamentally useless.
Aligning Engineering and Business
Setting these numbers early lets engineers arrange the building blocks and allocate resources efficiently. While the business sets the targets, software engineers should help stakeholders understand the technical trade-offs and the importance of each metric.
Measuring Success: Monitoring and Load Testing
Setting targets is only half the battle; you need to validate them with continuous measurement.
Phase A — Monitoring: We need to configure our infrastructure to track the non-functional requirements in real time. This provides the data needed to see whether the current application meets our defined scores.
Phase B — Load Testing: To avoid surprises, we use load testing tools that simulate real-world scenarios. Using virtual users and synthetic traffic, we can stress-test the system before it reaches the market.
The Next.js Lifecycle: Server-Side and Static
Understanding the internal mechanics of Next.js is fundamental to scaling. When you go from a single instance to launching dozens of replicas, knowing exactly what happens during a request lets you anticipate bottlenecks and manage resources effectively.
1. Dynamic Request Lifecycle (SSR/ISR)
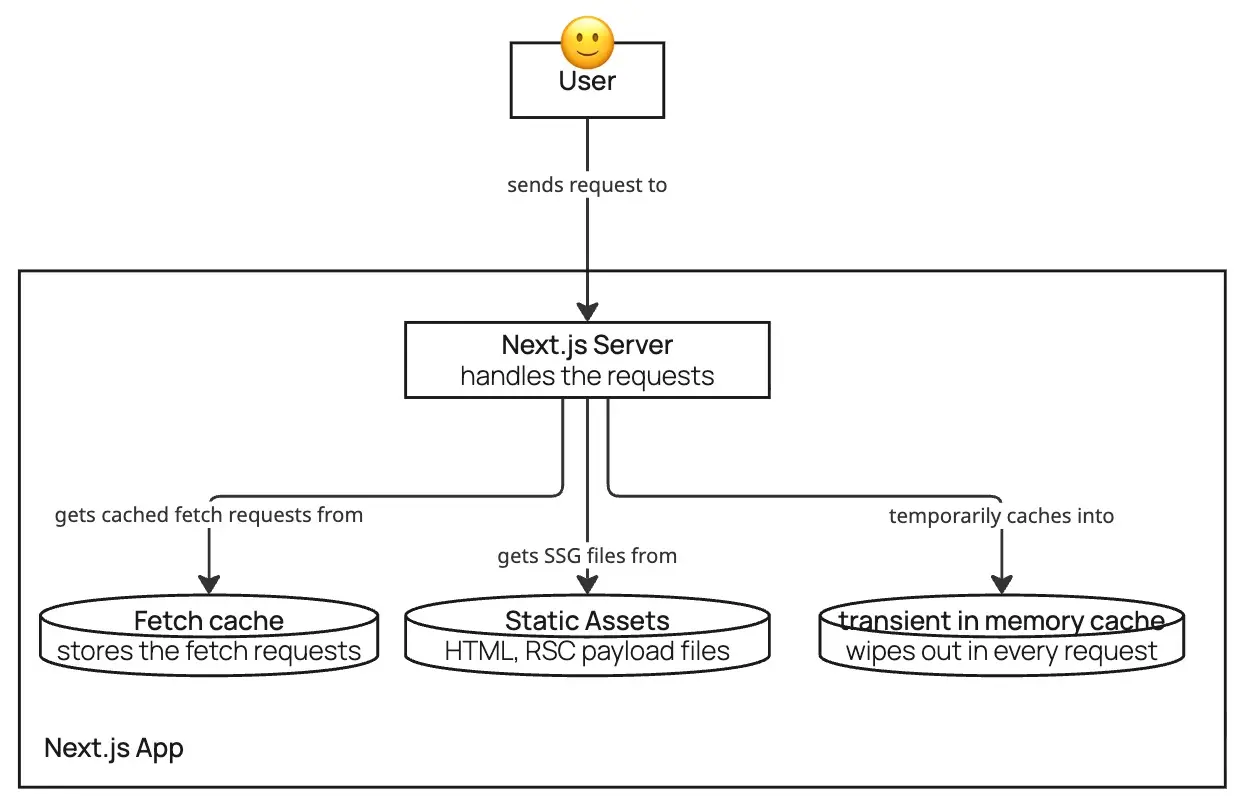
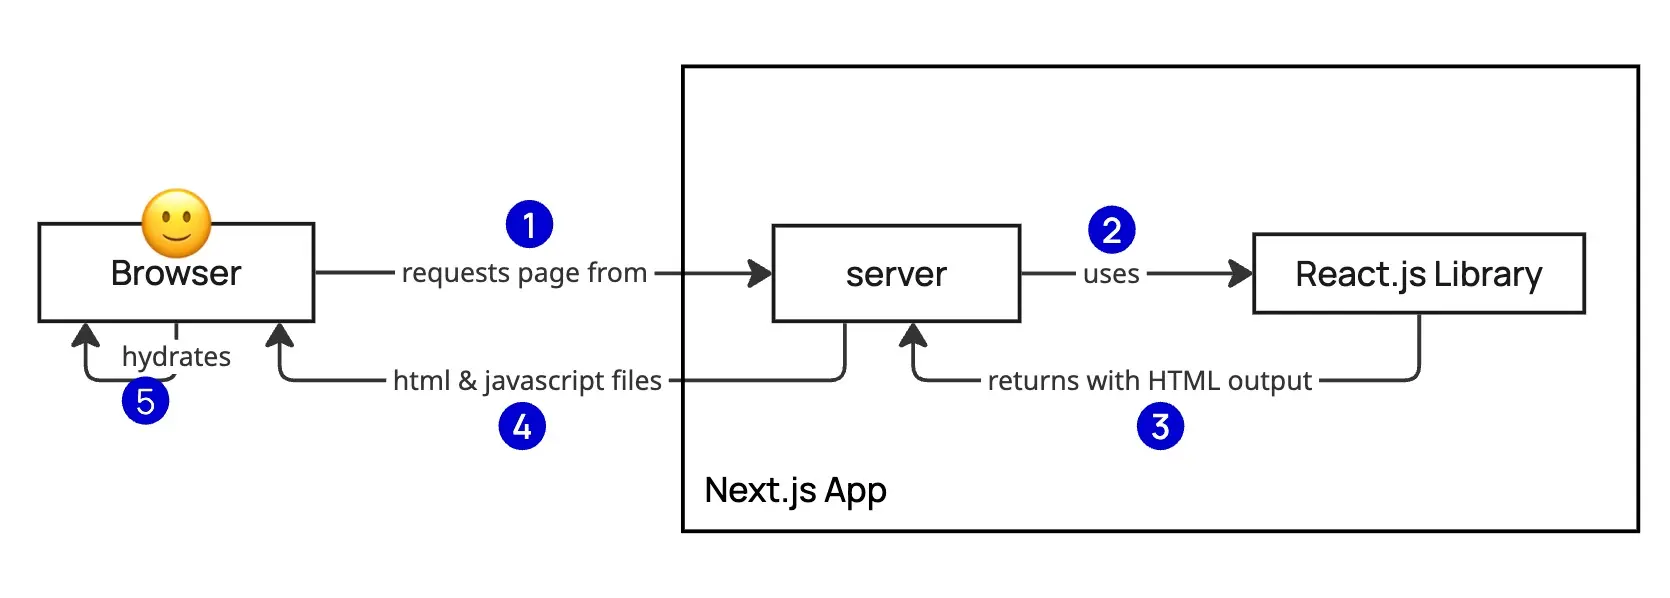
When a user requests a page from a running Next.js application, the server kicks off a multi-step process:
1. Rendering: Next.js uses its internal React engine to render the requested page on the server. 2. Payload Delivery: The server builds and sends a response containing: - HTML: For immediate visual rendering in the browser. - RSC Payload (React Server Components): A special data format required for the hydration step on the client. 3. Hydration: The browser uses the RSC payload to make the static HTML interactive without requiring a full page reload.
2. The Static Alternative (SSG)
If your application is built entirely without server-side dependencies (fully static), the lifecycle changes significantly:
- Build-Time Generation: All HTML, CSS and JavaScript files are generated once during the build.
- Static Hosting: Since there is no logic to run on each request, there is no need for a running Node.js server. These files can be served directly from a global CDN or a simple web server (such as Nginx or Apache).
- Scaling Advantage: Static sites are inherently easier to scale because they eliminate the CPU load of server-side rendering.
Details of the Request Flow
When a request enters a Next.js application, it is first intercepted by the existing proxy.ts (known as middleware in Next.js <15). At this stage developers usually decide whether to let the request continue, for example by performing authentication.
If the request is accepted, it is handled by the appropriate route based on the URL. At this stage Next.js first checks its internal cache to see whether a similar request has been made and whether it is still valid. If there is a valid entry, it uses the cached data for a faster response. If not, Next.js generates the response, serves it and caches it for future use.
Cache Layers in Next.js
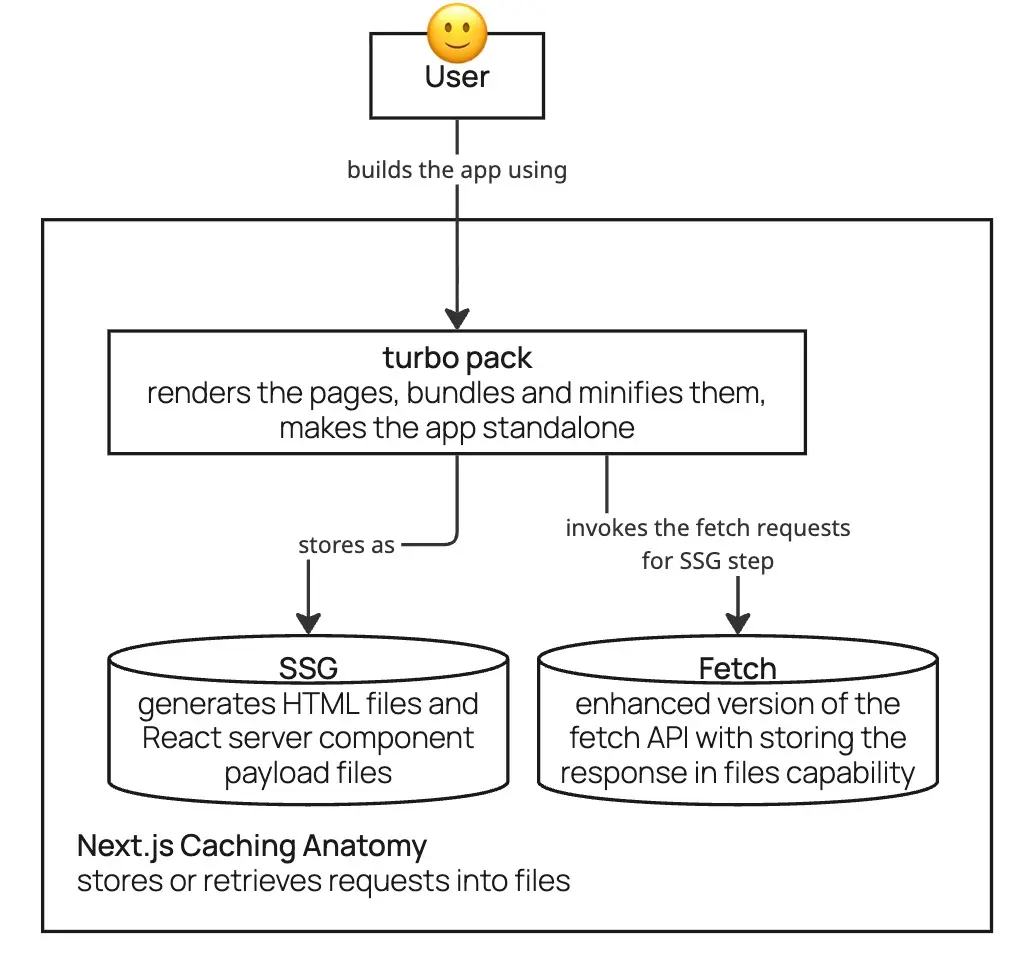
Caching in Next.js happens at several stages:
Build-Time Cache: When the user builds the application, Next.js generates static assets beyond the standard CSS and JS bundles. This includes the HTML output of pages, if the user uses Partial Prerendering (PPR) or avoids server-side capabilities that would force a page to be fully dynamic. During the build, Next.js also generates React Server Component (RSC) payload files and stores them alongside the other bundle files. This method of pre-generating content before a request is made is called Static Site Generation (SSG).
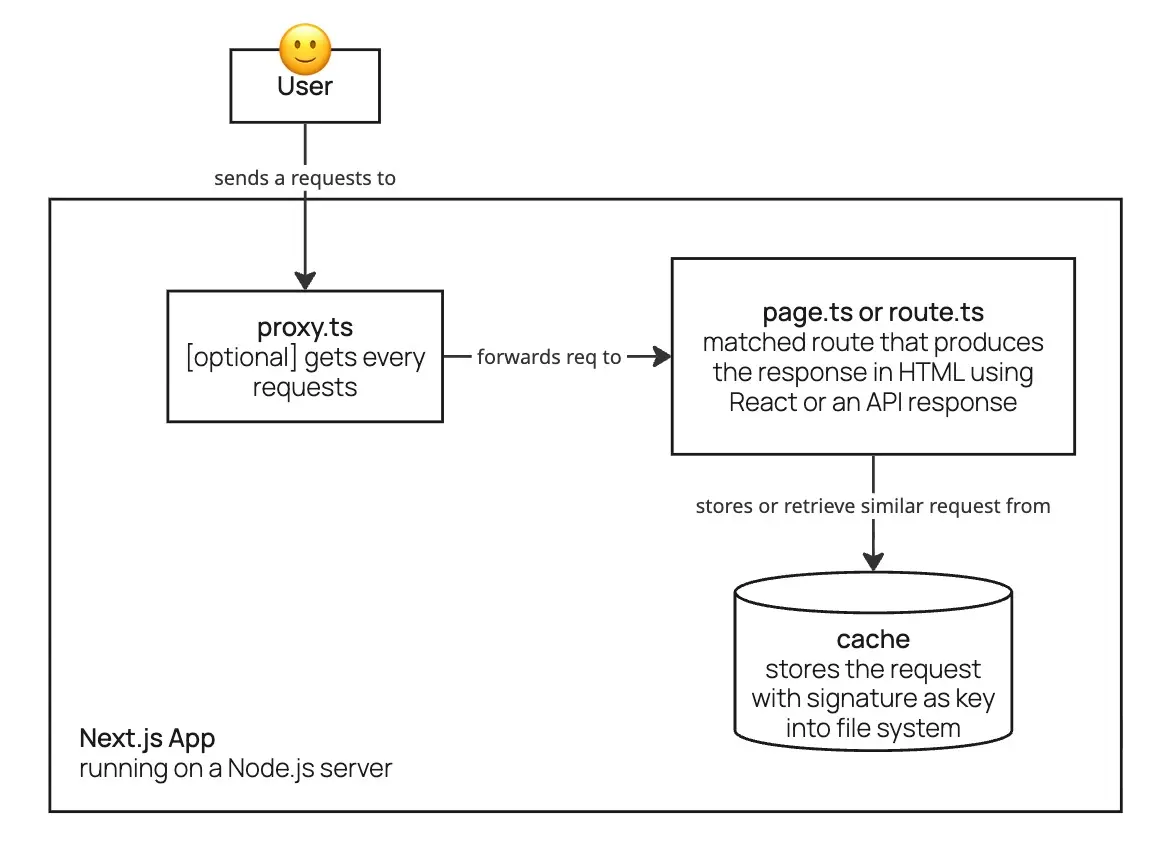
Runtime Cache: While the application is running, Next.js tries to find a matching entry in the cache for every incoming request. This cache may contain pre-generated HTML files, React Server Component (RSC) payloads or the results of fetch requests stored in the file system. Also, if the developer has implemented the React cache function or other custom caching mechanisms, these are used as well to produce the final response more efficiently.
The Critical Question: Multiple Instances
Now that we have examined the caching mechanisms, a critical question arises: what happens when we run two separate instances of the same application? Is data duplicated between each server's cache? Naturally, the answer is yes. This is the core problem we need to solve in horizontal scaling.
Make Your Next.js Application Performant: Quick Wins
Scaling Strategy: Quick Wins Before Horizontal Scaling
Before moving on to complex horizontal scaling (scaling out), there are “quick wins” that can make an application robust enough to meet performance targets with minimal effort.
1. CDN (Content Delivery Network)
Implementing a CDN arguably delivers the biggest Return on Investment (ROI) with the lowest complexity. By setting the right cache headers in your code and pointing your DNS to a CDN provider, you can achieve a 30–70% reduction in latency. It is a high-impact “set and forget” strategy for global performance.
Example 1: Setting Cache-Control headers in a Next.js Route Handler
// /api/hello/route.ts
export async function GET() {
  return NextResponse.json(
    { message: 'Hello World' },
    {
      status: 200,
      headers: {
        // CDN cache: cache for 1 hour, serve stale content during revalidation
        'Cache-Control': 'public, s-maxage=3600, stale-while-revalidate=59',
      },
    }
  )
}
Example 2: Customizing cache headers for static assets
// next.config.ts
const nextConfig: NextConfig = {
  async headers() {
    return [
      {
        // Caches all images under /public/images/ on the CDN for 30 days
        source: '/images/:path*',
        headers: [
          {
            key: 'Cache-Control',
            value: 'public, max-age=2592000, immutable',
          },
        ],
      },
      {
        // Caches JS/CSS chunks produced by the Next.js build for 1 year
        source: '/_next/static/:path*',
        headers: [
          {
            key: 'Cache-Control',
            value: 'public, max-age=31536000, immutable',
          },
        ],
      },
    ]
  },
}

export default nextConfig
The first example shows how to set cache headers on an API response for CDN caching. The second example shows how to customize cache headers for static images and the JavaScript/static files Next.js serves in production.
2. Vertical Scaling
Vertical scaling is a quick and effective way to increase scalability. By analyzing your application logic, you can determine the required resource baseline and add a buffer for peak traffic. In most cases this requires zero code changes and results in an application that runs smoothly under load.
3. Coding Best Practices
Adopting modern development techniques can significantly improve performance without infrastructure changes:
- Rendering Techniques: Using async components and Partial Prerendering (PPR) delivers content faster and significantly improves Core Web Vitals.
- DOM Optimization: Reducing DOM size and avoiding deeply nested structures speeds up rendering on both the server and the client.
- Leveraging Modern Frameworks: Staying current with the latest versions of Next.js and React brings immediate benefits: - React 19+: Introduces the React Compiler, which provides automatic memoization for more efficient components (enabled via configuration). - Next.js 16+: Offers the
use cache directive, which lets you cache the output of components or Server Actions with far less effort than in previous versions.Partial Prerendering (PPR) is enabled in Next.js 16+ with the cacheComponents flag. The static shell is sent immediately; wrap dynamic or async content in
// next.config.ts
const nextConfig: NextConfig = {
  cacheComponents: true,
}// app/page.tsx – static shell + dynamic content
export default function Page() {
return (
<>
<h1>Static shell (sent immediately)</h1>
<Suspense fallback={<p>Loading…</p>}>
<AsyncContent />
</Suspense>
</>
)
}
async function AsyncContent() {
const data= await fetch('/api/data').then((r)=> r.json())
return <div>{data.message}</div>
}Horizontal Scaling: Replicas and Load Balancing
Horizontal scaling (or scaling out) is the process of distributing replicas of a service across multiple machines. Instead of relying on a single server, the application is deployed on two or more nodes within the infrastructure. A Load Balancer acts as the entry point and distributes incoming traffic among these instances. A Load Balancer is a server running specialized software (such as Nginx) that uses specific algorithms to route requests:
- Round Robin: Distributes requests in turn, giving one to each server in order.
- Weighted Round Robin: Assigns requests based on each server's throughput or capacity.
- Least Connections: Sends new requests to the server with the fewest active connections at that moment.
- IP Hash: Routes requests based on the client's IP address, so the same user is always directed to the same server.
Architectural Challenges of Scaling
Horizontal scaling introduces architectural complexities that must be addressed to ensure system reliability.
1. Ensuring Statelessness
For effective scaling, an application must be stateless. This ensures that any replica can handle any incoming request regardless of the user's previous interactions.
- External State Management: If the application requires state (such as user sessions), this data must be moved to a shared resource such as a database or a global cache.
- Sticky Sessions: If full statelessness cannot be achieved, the Load Balancer can be configured with an IP Hash algorithm. This enables “sticky sessions,” ensuring that a given user's requests are always routed to the same server.
2. The Distributed Cache Problem
As discussed earlier, Next.js stores cache entries on the local file system by default. In a multi-instance setup, this leads to a “cold cache” problem and higher cache-miss rates because each server has its own isolated data. To solve this, you need to implement a shared cache that all instances can access. There are two main approaches:
- Shared Virtual Drive: Mounting a drive shared among all instances. This is not recommended, as it usually leads to concurrency bottlenecks and scaling problems.
- Redis Cache Cluster: Implementing a custom cache handler in Next.js using a cluster such as Redis. This lets all replicas store and retrieve cache entries from a single high-performance source.
> Resource: You can explore how to implement this through the official Next.js Redis Cache Handler example.
Strategic Scaling and Automation
Domain-Focused Scaling (Micro-Frontends)
Instead of replicating the entire system, you can split the application into Micro-Frontends based on Domain-Driven Design (DDD). This lets you scale specific domains that see higher demand. For example, on an e-commerce platform the “Product” service might need ten replicas to handle high traffic, while the “Profile” service might need only two.
Autoscaling with Kubernetes (K8s)
Modern infrastructures often use Autoscaling to manage resources automatically. Technologies like Kubernetes take Dockerized versions of your application and dynamically scale the number of replicas up or down based on real-time demand. This guarantees high performance during traffic spikes while reducing costs by shutting down unnecessary instances during low-traffic periods.
API Gateway
Centralizing repetitive logic in a dedicated layer improves scalability and maintainability; cross-cutting concerns such as caching and authentication become easier to optimize and enforce. A common candidate for extraction is authentication: when every application validates the user over and over before accepting a request (for example via proxy.ts in Next.js), that logic is a strong candidate for a separate, shared service.
An API Gateway fills this role by sitting in front of the infrastructure that must be protected from unauthorized access. It acts as a reverse proxy that hides internal services from public access and usually serves as the HTTPS termination point.
After the gateway terminates TLS, traffic between the gateway and your internal services can use plain HTTP, since it stays within your own network. This reduces overhead and simplifies internal communication.
Implementing an API Gateway usually involves deploying a reverse proxy such as Nginx (or a managed equivalent from your cloud provider, which also takes care of availability). For protected routes, the proxy is configured to validate authentication simply by forwarding the request headers to a dedicated auth service. If the token is invalid, the gateway returns the appropriate HTTP status (for example 401) and does not forward the request to the application.
The following Nginx configuration illustrates this pattern:
http {
    # 1. Define the locations of your microservices
    upstream cart_app    { server localhost:3001; }
    upstream product_app { server localhost:3002; }
    upstream profile_app { server localhost:3003; }

    server {
        listen 80;

        # 2. Internal Authentication Check
        # Where Nginx "asks" whether the token is valid
        location = /auth-verify {
            internal;
            proxy_pass http://your-auth-api/validate;
            proxy_pass_request_body off;
            proxy_set_header Content-Length "";
        }

        # 3. Protected Routes
        location /cart {
            auth_request /auth-verify;
            proxy_pass http://cart_app;
        }

        location /product {
            auth_request /auth-verify;
            proxy_pass http://product_app;
        }

        location /profile {
            auth_request /auth-verify;
            proxy_pass http://profile_app;
        }

        # 4. Error Handling
        # If the auth service returns 401, Nginx passes it on to the user
        error_page 401 = @error401;
        location @error401 {
            return 401 "Unauthorized - Invalid Token";
        }
    }
}
Optimizing File Uploads: From Local Storage to Blob Storage
A common pattern in web development is uploading files directly to the same server that handles form submissions. While simple, this approach poses significant challenges for enterprise-grade applications.
Drawbacks of Local File Storage
Storing user-uploaded files directly on your application server introduces three main risks:
1. Low Durability: If files are stored on the server's local disk, a hardware failure or server crash can lead to permanent data loss. 2. Reduced Scalability: Large file transfers consume significant bandwidth and CPU cycles, overwhelming the server and preventing it from handling other user requests efficiently. 3. Infrastructure Overhead: Later moving files from the application server to a more permanent storage location creates unnecessary internal traffic and complexity.
The Modern Solution: Blob Storage and Signed URLs
The industry-standard approach to handling file uploads is to use a Blob Storage service such as Amazon S3, Google Cloud Storage or Azure Blob Storage. These services offer:
- High Durability: Files are managed across replica sets, ensuring they stay safe even in the event of hardware failure.
- Increased Availability: Offloading file management lets your application server focus on logic and routing.
- Direct Uploads with Signed URLs: This is a critical feature for efficiency. Instead of the file passing through your server, your application generates a temporary Signed URL. The user's browser then uploads the file directly to the Blob Storage service.
By implementing direct uploads, you effectively remove the file transfer load from your infrastructure. This makes your system more scalable, reduces latency and lets your application handle a much higher volume of requests.
Event-Driven Architecture: Scaling High-Volume Interactions
Sometimes a single user interaction triggers a chain of internal service calls. For example, when a user clicks the “Add to Cart” button, a series of events usually follows:
1. Cart Service: Storing the product in the user's cart. 2. Analytics: Sending data to an external tracking tool. 3. Logging: Collecting system logs for monitoring. 4. Inventory (SAP): Calling ERP services to decrement product availability.
When thousands of users perform this action at the same time, it results in tens of thousands of calls. If these are processed synchronously (waiting for one to finish before starting the next), the system quickly slows down or crashes under load.
Decoupling with Event-Driven Architecture
A superior approach to achieving high performance and scalability is to decouple these services using Event-Driven Architecture (EDA). Instead of the application waiting for each service to respond, it simply publishes an “event.”
- Asynchronous Calls: The primary user action (adding to the cart) completes instantly and the downstream tasks are processed in the background.
- High-Throughput Processing: Using an event bus such as Kafka allows the system to ingest an enormous volume of data. Kafka acts as a buffer and keeps the main application responsive to the user even if downstream services (such as a legacy SAP system) are slow.
- System Resilience: If the analytics or logging service goes down, the “Add to Cart” action still succeeds and the events are processed when the services come back online.
Optimizing Communication Protocols: HTTP/2 and gRPC
Choosing the right communication protocol is vital for maintaining a high-quality, modern infrastructure. Upgrading from older protocols to HTTP/2 and gRPC significantly improves throughput, scalability and overall system performance.
1. Advantages of HTTP/2
HTTP/2 offers several key features that solve the bottlenecks of HTTP/1.1:
- Multiplexing: Allows multiple requests and responses to be sent over a single TCP connection, greatly reducing the overhead of opening new connections.
- Binary Framing: Encodes data in binary format instead of plain text, making it much faster for machines to parse.
- Header Compression (HPACK): Reduces the size of request and response headers, saving bandwidth and improving latency.
Nginx Configuration: To enable HTTP/2 in Nginx, simply add the http2 parameter to your listen directive:
server {
    listen 443 ssl http2;
    server_name api.example.com;
    # ...
}
2. Service-to-Service Communication: gRPC vs. REST
While REST is common for public APIs, gRPC is often the superior choice for internal service-to-service communication.
- Efficiency: gRPC uses HTTP/2 as its transport layer by default and inherits all of its performance advantages.
- Protocol Buffers (Protobuf): Unlike REST, which usually uses text-based JSON, gRPC uses a binary format. This results in significantly smaller payloads and reduces the CPU overhead required for serialization and parsing.
- Strong Typing: gRPC requires defined service contracts, which reduces errors in communication between microservices.
Conclusion and Practical Advice
Taking Next.js to enterprise scale means going beyond the defaults: defining SLAs and SLOs, understanding the request lifecycle and cache behavior, and then layering in CDN, horizontal scaling with a shared cache, API Gateways, Blob Storage, and Event-Driven or HTTP/2/gRPC-based communication where appropriate.
No team can adopt everything at once, and that's perfectly fine. Start with the highest-impact, lowest-friction wins (for example CDN and cache headers, or moving auth behind an API Gateway), measure against your SLOs, then iterate.
The goal is a system that stays performant and maintainable as traffic and complexity grow. Pick the area from this post that matches your current bottleneck and try it in your next sprint.
Key Reminders:
- Always set up your monitoring and load testing infrastructure before you start scaling
- CDN is the lowest-cost, highest-ROI first step
- A Redis cache cluster provides consistency across multiple Next.js instances
- An API Gateway centralizes repetitive security logic
- Event-Driven Architecture provides system resilience for high-volume interactions
- HTTP/2 and gRPC bring major performance gains in service-to-service communication